Step By Step Guide
Step 1: Identify Condyle
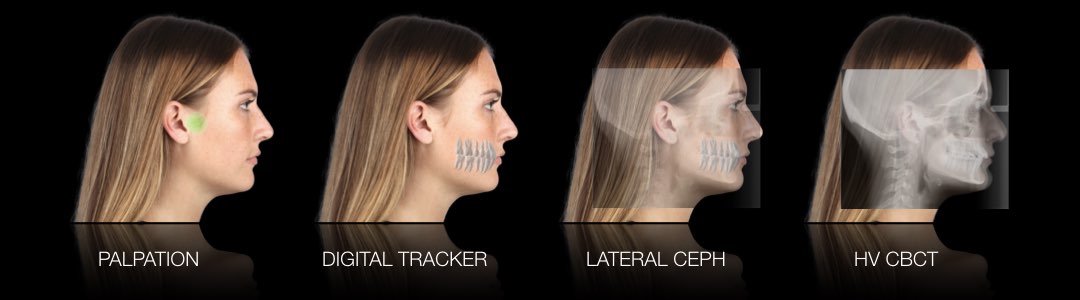
Identify and mark the condyle's position using methods such as palpation, digital trackers, lateral cephalometry, or HV CBCT. While HV CBCT provides the most precise results, any of the other methods are suitable if an HV CBCT scanner is unavailable. Apply a small mark on the skin or use a radiographic marker.
Step 2: Identifying and Capturing the Facial Midline
Start by aligning the two fences of the occlusal bite plate with the patient’s facial midline. This allows us to capture any discrepancy between the facial and dental midlines.
Apply a generous amount of bite material to the occlusal plate, ensuring the incisal edges make full contact with the fences and create as many indentations as possible. The facial midline and occlusal fences should be properly aligned with each other.
Step 3: Identify Baseline
When identifying the baseline, the reference points are the corner of the ear (Otobasion Superius) and the corner of the eye (Exocanthion). It is essential that the patient's head is positioned at 0 degrees and that the operator is at eye level with the patient. If the patient has long hair, ensure it is pulled back or secured with a hair tie so the ear remains visible.
Step 4: Choose the Protocol (Analog/Digital)
For analog use the black cube and black components. For digital, use the white cube, and the white components.
Step 5: Assemble the OneBite Evolution System
Start by sliding the arch onto the cube’s ball joint connector. Press firmly to ensure the connector is fully secured. Next, slide the occlusal bite plate with the patient’s record, into the arch.
Proceed to assemble in the following order:
Remove cube nut
Attach midline bar
Attach horizontal bar to the midline matching the pins
Secure the cube nut
Place Baseline bar onto midline
Secure Baseline trinity screen
Step 6: Micro Adjustments
Before placing the system back in the patient's mouth, ensure the ring is tightened enough to allow for micro-adjustments. Use the screw attached to the ring to adjust the tension, turning it to the left to tighten. Keep the ring slightly tightened to enable adjustments before fully securing the position.
Step 7: Capture the Terminal Hinge Values
Align the baseline bar with the patient's baseline, which extends from the corner of the eye to the corner of the ear. Ensure the patient's head is positioned at 0 degrees. Either be at eye level with the patient or have an assistant at eye level to guide alignment from the side.
Verify that the midline bar is properly aligned with the patient’s facial midline. Ensure there is even spacing between the bars at the front and back, with consistent space between the patient’s head and the baseline bar.
Step 8: Secure the Record
Once everything is aligned, secure the system using the cube locking mechanism. There are two locking methods: the ring and the ring screw. Tighten the cube ring to the left, then lock the screw for extra security.
Step 9: Record the Values
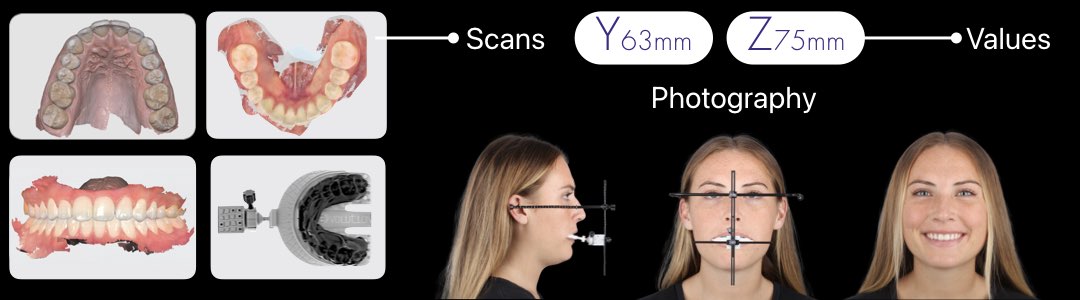
Once the baseline bar has been locked in position record the terminal hinge baseline (Z) and midline (Y) values. Move the small rubber band to the number that aligns with the condyle and record the Z number. The number located on the midline above the baseline connector is the Y value, also record this.
Step 10: Photography
Now that the Z and Y values have been recorded, take photography from the right side of the patient's face with the camera eye level with the baseline, along with a front-facing shot of the patient with the OneBite evolution system in place. Also, take a photo of the patient smiling for reference.
Things to Note:
When capturing photographs, align the camera parallel to the baseline to prevent the rear bar from being visible. At the correct angle, the bar should appear as a single line.
Step 11: Remove the System
Remove the system from the patient. Begin by unscrewing the OneBite nut, removing the horizontal bar, and then the midline bar from the cube. Take the record out of the patient’s mouth, and all record information will now be within the cube.
Both the analog and digital protocols are the same up until the transfer process.
Before You Send The Record:
Please make your dental laboratory aware that they need the companion Technician System or Digital Mounting Adapter to complete the workflow. Our team is available to support the laboratory directly for a successful outcome.
Transferring the Analog Record
Step 1: Remove the Bite Record
Begin by removing the occlusal plate with the bite from the arch
Step 2: Ensure the Record is Secured
Check the record is secured by solely tightening the security screw. Once secured, send the cube connected to the OneBite arch and the occlusal plate separately.
The cube record is all that the laboratory will need for the case, with no additional equipment required for the analog protocol.
Transferring the Digital Record
The only difference between the analog and digital protocols is the transfer method. For the complete protocol up to this point, refer to the Clinician System Protocol.
Step 1: Prepare the Record for Scanning
Unscrew the OneBite cube nut on the back of the cube and position the Scan Cap across the ball joint arch connection. The cap is designed to help if the scanner gets lost over the arch during scanning.
Step 2: Connect to the Cube Holder
Insert the cube into the clinician cube holder and screw the nut back on to secure the record in place. Then, place the scan cap to bridge the gap between the arch connector and the cube.
Step 3: Prepare the Intraoral Scanner
Ensure the scanner is fully charged and calibrated for the session.
important: Before beginning the scan, ensure that any AI settings on the intraoral scanner are turned off. If left on, the AI may omit crucial information, leading to an inaccurate capture of the record.
Step 4: Scan the Record
Proceed with scanning the bite, beginning at the arch and steadily work the scanner around the bite. After scanning the bite, return to the incisal edge and continue scanning up to the top of the arch, across the ball joint, and up to the top surface of the cube. Make sure to scan all three sides of the cube.
Step 5: Send the Digital Information
Send the following files to the laboratory: the patient's upper, lower, and bite scans, along with the OneBite cube record scan. Include the patient's Z and Y values, as well as photos of the right side and front of the patient with the OneBite Evolution system in place. Additionally, provide a reference picture of the patient smiling.
This provides all the necessary information for the laboratory, eliminating the need to send any physical equipment for the full digital protocol.
Downloadable Resources